The Science of Mold Prevention in Commercial Bathroom Vanities: A 2026 Technical Guide
For facility managers and hotel operators, "black mold" (Stachybotrys chartarum) is more than a cleaning nuisance—it is a structural failure signal. In commercial hospitality projects, nearly 40% of premature bathroom furniture replacements are caused not by mechanical breakage, but by moisture damage and fungal growth.
While surface mold can be cleaned, interstitial mold—growth that occurs inside the cabinet material or behind the unit—is often undetectable until the vanity begins to delaminate or emit a musty odor.
This technical guide analyzes the hygroscopic properties of common vanity materials, the role of thermal bridging in condensation, and how to specify inorganic furniture solutions (like Stainless Steel or PVC) for high-humidity environments.
1. The Physics of Failure: Why Vanities Rot
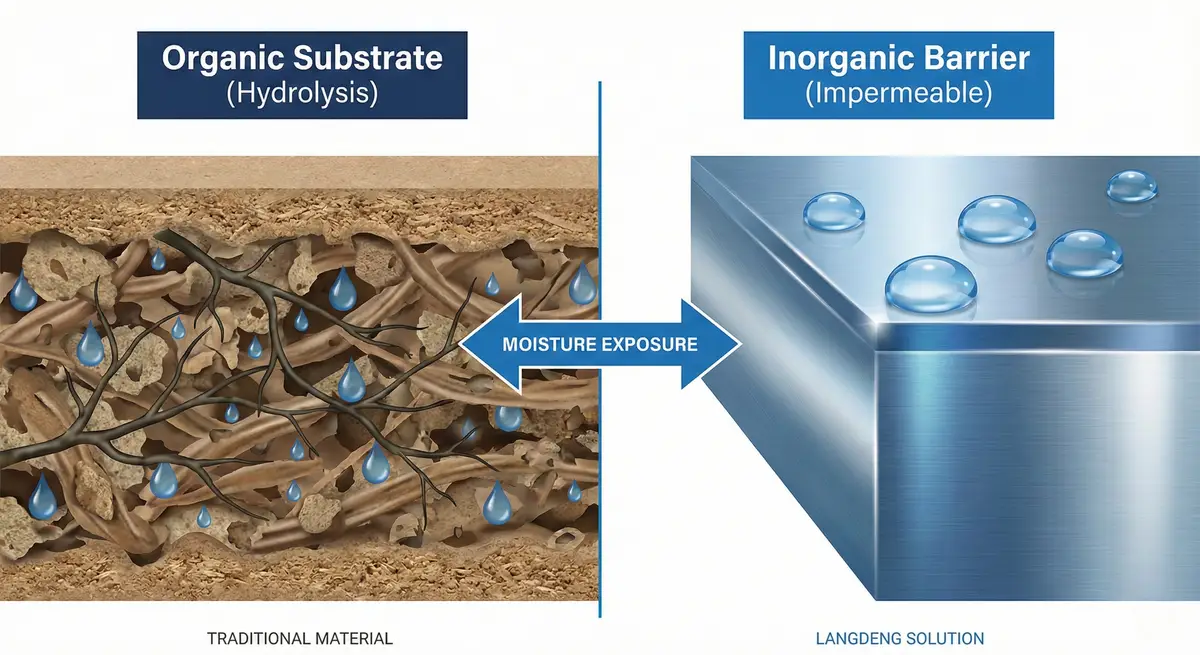
To understand why a 2-year-old MDF vanity fails, we must look at Relative Humidity (RH) and Material Permeability.
The "Thermal Bridge" Effect
In air-conditioned hotels, the bathroom vanity surface is often cooler than the steamy air from a shower. This temperature difference causes the vanity to reach its Dew Point, creating condensation.
- On Wood/MDF: This condensate is absorbed into the fibers via capillary action. The glue binding the MDF particles breaks down (hydrolysis), creating gaps where mold spores settle and feed on the cellulose.
- On Inorganic Materials: The condensate sits on the surface until it evaporates. There is no absorption, and thus, no structural degradation.
2. Comparative Analysis: Organic vs. Inorganic Substrates
When writing specifications for a new project, understanding the Water Absorption Rate (WAR) of your substrate is critical.
| Substrate Material | Structure Type | Water Absorption (24h immersion) | Fungal Resistance (ASTM G21) |
|---|---|---|---|
| MDF / Plywood | Organic Fibers + Resin | 10% - 30% (Swells) | Poor (Provides Nutrients) |
| High-Density PVC | Closed-Cell Polymer Foam | < 0.5% (Negligible) | Excellent (Inert) |
| 304 Stainless Steel | Austenitic Metal Alloy | 0.00% (Impermeable) | Perfect (Non-Nutrient) |
3. Deep Dive: The "Closed-Cell" Advantage of PVC
Not all plastics are the same. High-quality commercial bathroom vanities use Micro-Foamed PVC Board with a closed-cell structure.
Unlike wood, where fibers act like straws sucking up water, closed-cell PVC consists of millions of tiny, sealed air bubbles. Even if the outer paint is scratched or the cabinet is submerged due to a pipe burst, the water cannot migrate into the core. This makes PVC Vanities the cost-effective standard for rental properties and budget hotels.
4. The Hygiene Standard: 304 Stainless Steel
For 5-star hotels and hospitals, hygiene goes beyond "waterproof." It is about cleanability.
Stainless steel creates a naturally Passive Chromium Oxide Layer on its surface. This atomic layer is self-healing and non-porous. While mold can technically grow on soap scum left on steel, it cannot root into the steel itself. A simple wipe with disinfectant removes the colony 100%, whereas mold in wood sends "roots" (mycelium) deep into the board, making surface cleaning futile.
5. Structural Design: The Hidden Cause of Mold
Material is only half the battle. Poor airflow design creates "dead zones" where humidity gets trapped.
Problem A: The "Full Back" Panel
Many residential vanities have a solid back panel. If installed against a tiled wall that sweats, moisture gets trapped between the tile and the wood back, creating a hidden mold farm.
The Solution: Langdeng's commercial units often feature an "Open Back" or "Ventilated Back" design to allow air circulation around the plumbing trap.
Problem B: Floor-Standing vs. Wall-Hung
In windowless bathrooms, air circulation at floor level is near zero. Water from mopping wicks into the legs of floor-standing cabinets.
The Solution: Specifying Wall-Hung (Floating) Vanities allows HVAC airflow to pass under the cabinet, keeping the floor dry and reducing local humidity levels.
6. Installation Protocols for High-Humidity Zones
Even the best furniture fails with poor installation. We recommend the following protocols for tropical or unventilated bathrooms:
- Silicone Integrity: Use mold-resistant (biocide-treated) sanitary silicone for sealing the vanity top to the wall. Gaps here are the primary entry point for water behind the cabinet.
- Escutcheon Plates: Always seal the pipe penetrations (where pipes come out of the wall/floor). Unsealed holes allow humid air from the wall cavity to enter the vanity.
- Offset Spacing: If possible, use spacers to leave a 2mm air gap between the cabinet back and the wall, allowing condensate to drain rather than soak.
Frequently Asked Questions (FAQ)
1. Can I use "Marine Grade Plywood" to prevent mold?
Marine ply is better than standard MDF because it uses waterproof glue, but it is still wood. Over 5-10 years in a steamy bathroom, the finish will eventually degrade, and the wood layers will absorb moisture. It delays the inevitable but does not solve the root cause like Steel or PVC.
2. How do I remove mold from my existing vanity?
If the mold is on the surface of melamine, bleach works. However, if the wood has swollen or feels soft/spongy, the rot is structural. No amount of cleaning will save it; the core is compromised and replacement is required.
3. Is PVD Stainless Steel safe for bleach cleaning?
Yes. Physical Vapor Deposition (PVD) finishes are extremely hard and chemically stable. Unlike painted fixtures, quality PVD stainless steel can withstand standard bathroom disinfectants without fading, making it ideal for the harsh cleaning regimes of hotels.
Conclusion: Specifying for Longevity
Preventing mold is not about buying better cleaning products; it is about specifying the right materials and design at the construction phase.
For your next project, consider the Total Cost of Ownership (TCO). A Stainless Steel vanity may cost 20% more upfront than wood, but it eliminates the need for replacement every 5-7 years.
Request a Technical Data Sheet for our inorganic bathroom furniture solutions.